
Meet Informatiqal


The initial idea was simple ... on paper. Spend few days just to prove that its possible. And it was doable. But to achieve it I had to build solid foundation.
I'm not going to say what was the initial idea ... yet. But will share where it's "home" will be and will release all the components of the "foundation".
Since there will be multiple components I've decided that it's a good idea to separate them in their own space.
So let me introduce you to Informatiqal
Informatiqal has it's own website and it's own GitHub organization:


Code for a few mode modules is publicly available but want to meet you with the "base of the base". The others are still WIP.
Qlik REST API
This a "generic" package. It simplifies the communication with various Qlik Sense REST API endpoints (Repository, Proxy, SaaS etc.) but still we have to know what actual endpoint have to be called and what data has to be passed.
But on top of it few more packages are/will be created which are going to make the development process more pleasant.
qlik-rest-api can be used from within both NodeJS and browser(s). The example below shows how certificate authentication can be used (from NodeJS) to communicate with Qlik Repository REST API.
import fs from "fs";
import https from "https";
// read the certificates
const crt = fs.readFileSync("path/to/certificate.pem");
const key = fs.readFileSync("path/to/certificate_key.pem");
// init https agent
const httpsAgent = new https.Agent({
rejectUnauthorized: false,
cert: crt,
key: key,
});
// create the config object by passing the created httpAgent
const config = {
host: "my-qlik-sense-instance",
port: 4242, // optional. default is 4242
httpsAgent: httpsAgent,
authentication: {
user_dir: "SOME_DIR",
user_name: "SOME_USER",
},
};
// initialize the repo client by passing the conifg object
const repoClient = new QlikRepositoryClient(config);
// invoke Repository API "about" endpoint
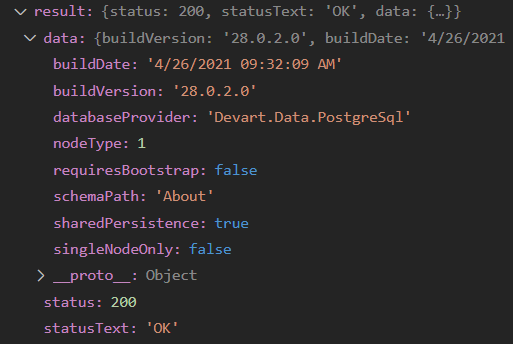
const result = await repoClient.Get("about");And the result variable will be in format:
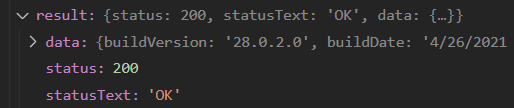
And the data property will hold the response data:
Feel free to check the package repository page. Don't forget to check the Wiki section for more details and examples.
 Informatiqal
Dev documentation of all exposed methods, types and interfaces can be found at:
P.S. Please feel free to open issue for any question or bug you encounter :)
Hope you liked it!
Stefan