
Web app authentication with QSEoW (web ticket)


This post is long overdue but finally found the time to complete it.
Here we'll have a look how to establish connection (via enigma.js) to Qlik Sense Enterprise on Windows (QSEoW) when hosting an web app outside of Qlik (not as an extension). And more specifically we'll have a look at what is the authentication work flow.
The (very simple) web app will just list the apps that are available for the logged in user. I'll be using Svelte as web framework (more specifically SvelteKit) but the general work flow should work in the same way with other frameworks as well.
Let's begin!
The problem
When our web app is hosted by Qlik (as an extension) we can only access it through Qlik's extensions url (like: https://my-sense-instance.com/extensions/MyMashup/index.html) It's not a very nice URL. And every time when new version of our web app is ready we'll have to remove the old extension and re-upload the new version. (of course this can be automated)
The benefit of having the web app hosted by Qlik is that in order to access it you'll have to be authenticated. If not - Qlik will handle the redirection.
In our case we will redirect the user to Qlik's login page, receive web ticket and use the ticket to establish connection with the engine.
Scenario
The scenario is very simple:
- using
enigma.jsto establish session with Qlik Engine. - once the session is esablished get list of all user's apps
- display the apps list on the page
Session events
Crucial part of the authentication work flow is enigma's capability to "listen" for specific events (check out the Session API part of the documentation)
Enigma can "listen" for various events (like session closed, session suspended, all the traffic send/received to/from the Engine or any named notification).
In our case we'll listen for OnAuthenticationInformation event. This event can tell us if we must authenticate and if we must it will provide us with the URL to the Qlik's login page. Once authenticated there Qlik will re-direct us back to the web app but with the Qlik ticket in the url. The ticket then can be used when establishing connection with enigma
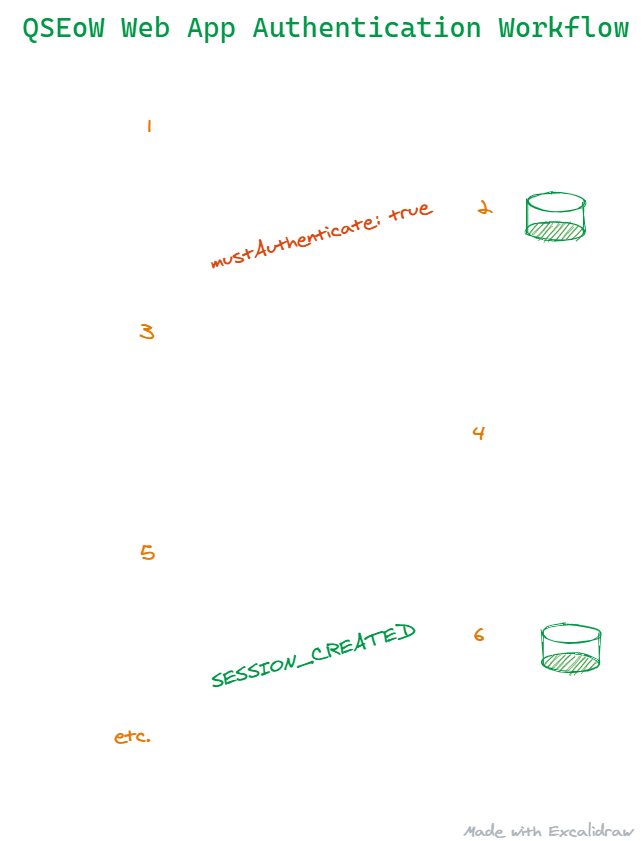
General workflow
- When the user opens the web page we'll try and connect to QSEoW via Web Sockets (
await session.open()) - If the users is not authenticated Qlik will "raise"
OnAuthenticationInformationnotification event. The event contains simple JSON object:
{
  mustAuthenticate: true,
  loginUri: "https://..."
}
- In our code we are listening for
OnAuthenticationInformationevents and when receive one (andmustAuthenticate: true) we are going to redirecting the user to theloginUrivalue from the event loginUriis the main Qlik login page (not part of our web app!). The user enters their credentials there- If the credentials are ok then Qlik redirect back to our web app page but with
qlikTicketadded to the url as a parameter - Again we send
session.open()but this time we'll provide theqlikTicket - Qlik replies with
SESSION_CREATED - And at this point we are all set and can continue communicating with the Engine. All requests will be made in the scope of the logged user
The image below illustrate what is the general work flow to establish session and authenticate
Code
The first bit of code is to handle the URL parameter. If the URL contains `qlikTicket` we'll pass the value as property. When the page is loaded for the first time the value of `qlikTicket` will be empty.
<script context="module">
  export const load = async ({ url }) => {
    let qlikTicket = url.searchParams.get("qlikTicket");
    return { props: { qlikTicket } };
  };
</script>
Importing enigma and `goto` from Svelte navigation. `goto` will be use to re-direct to the login url.
<script>
  import { goto } from "$app/navigation";
  import enigma from "enigma.js";
  import schema from "enigma.js/schemas/12.67.2.json";
Define Qlik host and URL for the web app. The web app location can be found programmatically of course.
  const qsHost = "wss://my-sense-instance.com";
  const reloadURI = `http://localhost:3000`;
Define few variables:
qlikTicket- will hold the Qlik ticket (when we have it)qlikApps- will hold the list of the Qlik appsqlikTicketString- the ticket have to be passed as URL parameter itself. This variable will contain this string
export let qlikTicket;
let qlikApps = [];
let qlikTicketString = qlikTicket ? `&QlikTicket=${qlikTicket}` : "";
Generate the session object. The interesting part here is the url. The url is containing three "elements":
${qsHost}/app/engineData- setting the Qlik host as usualreloadURI=${encodeURIComponent(reloadURI)- this part tells Qlik to return to this location once the user is successfully authenticated (in our case this will behttp://localhost:3000)${qlikTicketString}- when we have the ticket it will be passed here
const session = enigma.create({
    schema,
    url: `${qsHost}/app/engineData?reloadURI=${encodeURIComponent(
      reloadURI
    )}${qlikTicketString}`,
    createSocket: (url) => new WebSocket(url),
  });
The session event part. If notification of type `OnAuthenticationInformation` is received and the event data contains `loginUri` then re-direct the page to this url. Once the user authenticate there Qlik will return us to our web page but with the ticket appended at the end. The url will looks like:
  session.on("notification:OnAuthenticationInformation", (data) => {
    if (data.loginUri) goto(data.loginUri);
  });
The main logic. Once the session is successfully established - get the list of the apps and populate `qlikApps` variable with it.
  (async function () {
      let global = await session.open();
      qlikApps = await global.getDocList();
      console.log(qlikApps);
      await session.close();
  })();
</script>
The HTML part is very basic:
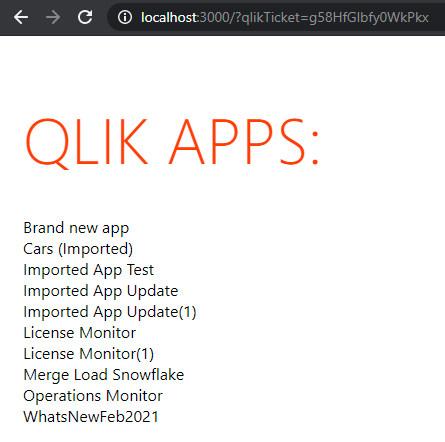
<main>
  <h1>Qlik apps:</h1>

  {#each qlikApps as qlikApp}
    <div>{qlikApp.qDocName}</div>
  {/each}
</main>
And the result:
Once the local development is complete the bundle can be hosted anywhere
Complete code
The full code is available at the repo below. Follow the readme there to install and run it.
 countnazgul
Hope you liked it!